So, you have an XCP-ng host machine with only 1 GPU, and you want to use that GPU to pass-through to a guest VM, leaving your XCP-ng host TRULY headless? Yup. You can do that. We will cover “the easy way” using the latest XCP-ng Center, but this can be done with xe / Xen API and/or XenOrchestra Appliance (XOA) also.
BIG shout out to Michael Manley (https://github.com/michael-manley) of Wise Global Solutions for keeping XCP-ng Center Alive for the latest XCP-ng 8.3 LTS Release!
This solution is very simple to use, but the XOA and xe cli methods really aren’t all that much more complicated, either.
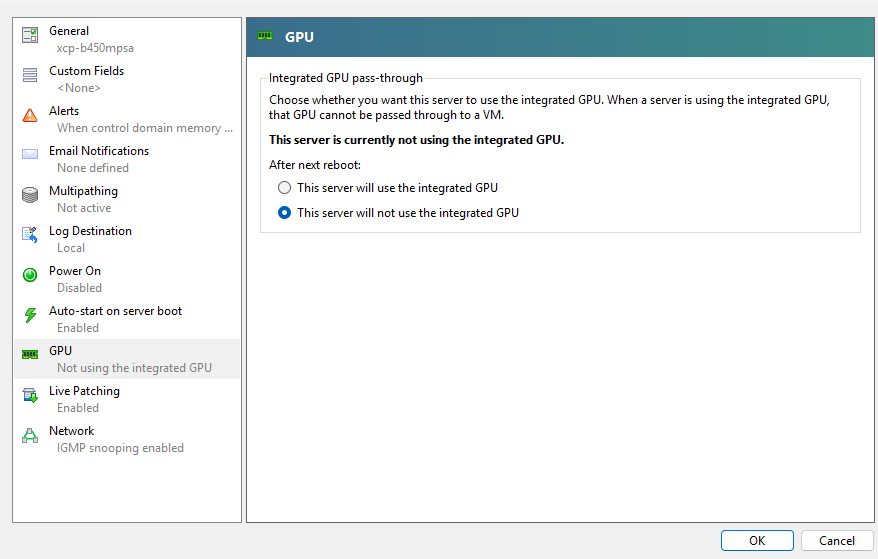
Right click on your XCP-ng host that you want to assign its only GPU (or ALL of its GPUs) to a guest VM for, and click the “GPU” menu option on the left. Once in the GPU menu, toggle the radio button to “This server will not use the integrated GPU” (instead of the default of “This server will use the integrated GPU”), like so:
Then, you can either reboot or restart tool stack if you need to (you may not). And that’s technically all there is to it.
But… what happens if something goes horribly wrong (or even slightly, if we are being honest)? Then what? There is no way to get to the XCP-ng console with a physical monitor and keyboard, after boot time, if you do this.
BIOS/UEFI will still work the same, but no video to the physically connected monitor will display, therefor making the physically connected keyboard somewhat pointless.
In this case, you have 2 options, and/or two likely scenarios that have lead you to find this article in the first place:
Probably the most common: You used your only GPU as a pass-through to a guest VM, and now you need to get back into the console for some reason, like a janky or suspect networking configuration snafu or hardware or configuration issue. Here is the quick and dirty fix for getting your GPU back temporarily:
During boot, the grub menu should display for 5 seconds, but default, before it auto-selects the first menu option in your XCP-ng installation to your boot-able hard drive (OR maybe you are a Clover user with NVMe or similar trickery? doesn’t matter, works the same). During that “5 second window of time” before the top-most menu item gets auto-selected after the timer runs out, you can press ‘e’ on your keyboard and enter into “grub temporary edit mode”. Select the first entry in the list that would normally boot into XCP-ng host, but also LOSES your video, because you used your only GPU (or ALL of your GPUs) as a pass-through to a VM… and now you need to do some editing to your network connection, so you pulled out the spare monitor and keyboard (or worse…) and hooked everything up, physically (so 90s, right?). While you’re in ‘e for edit’ mode in the grub editor, find this chunk of config, (its usually at the end of the 3rd or 4th line, but it depends):
`xen-pciback.hide=(0000:0x:00.0)`
Where “x” with be a hexidecimal between 0-9 or a-f (0=0, f=15)
You will likely have the same looking setup with a character difference, maybe two, but the important thing is to:
REMOVE this from the editor configuration “xen-pciback.hide=(0000:0x:00.0)”
But ONLY that section, NOT the whole line, and NOTHING ELSE (though be sure to leave spaces where they below, between entries) and then you can hit F10 to boot with this TEMPORARY MODIFICATION to grub BOOT LOADER.
it typically looks like this:
—
setparams ‘XCP-ng’
search –label –set root root-dpefle
multiboot2 /boot/xen.gz dom0_mem=4304M,max:4304M watchdog ucode=scan dom0_max_vcpus=1-16 crashkernel=256M,below=4G console=vga vga=mode-0x0311
module2 /boot/vmlinuz-4.19-xen root=LABEL=root-dpefle ro nolvm hpet=disable console=hvc0 console=tty0 quiet vga=785 splash plymouth.ignore-serial-consoles xen-pciback.hide=(0000:08:00.0)
module2 /boot/initrd-4.19-xen.img
—
Unless you want to save it? If you want to “make it permanent” and stop using GPU pass-through for the integrated GPU (Which might be a PCIe GPU, if its the ONLY one on the system) edit this file AFTER you “are back in”: `/boot/efi/EFI/xenserver/grub.cfg` after you get booted up and back into the console.
This isn’t that big of a deal, and very easy, really. But if you want to make it even more “safe and simple”, you can actually add a new entry into GRUB menu by copying that 1st top option and adding the copied version to the BOTTOM of the menu items list with the removed “xen-pciback.hide=(0000:0x:00.0)” section and save it something like (EXAMPLE ONLY):
menuentry ‘XCP-ng (OH CRAP HANDLE for GPU BACK TO HOST)’ {
search –label –set root root-xppxix
multiboot2 /boot/xen-fallback.gz com1=115200,8n1 console=com1,vga dom0_mem=4600M,max:4600M watchdog ucode=sca n dom0_max_vcpus=1-6 crashkernel=256M,below=4G
module2 /boot/vmlinuz-fallback root=LABEL=root-xppxix ro nolvm hpet=disable console=tty0 console=hvc0
module2 /boot/initrd-fallback.img
}
This has its merits and use cases, but its also another piece of custom config you need to track and maintain, too. If you can simply remember to remove “pciback.hide=(va:lu:e)” then that’s fine, too.
Good luck out there!